Voyado Engage Integration
This guide walks you through connecting Fluentos with Voyado Engage so that every lead captured by your campaigns is automatically sent to Voyado as a contact profile.
It also explains how to enable audience targeting for visitors arriving from Voyado links, so you can identify returning visitors and show campaigns only to specific Voyado Target Audiences.
You will need:
- Access to Voyado Engage with admin permissions
- A Fluentos account with an active website
1. Generate an API Key in Voyado
Section titled “1. Generate an API Key in Voyado”Before setting up the integration in Fluentos, you need to create an API connection in Voyado Engage.
-
Log in to Voyado Engage.
-
On the left side, select Administration.
-
Go to Config Hub -> Integrations & External systems -> API Connections.
-
Click Add API-connection.
-
Fill in the form:
- Name -> select
Other - Other name -> type
Fluentos - Type -> select
Ecom - API-allowlist -> leave empty (unless your security policy requires IP whitelisting)
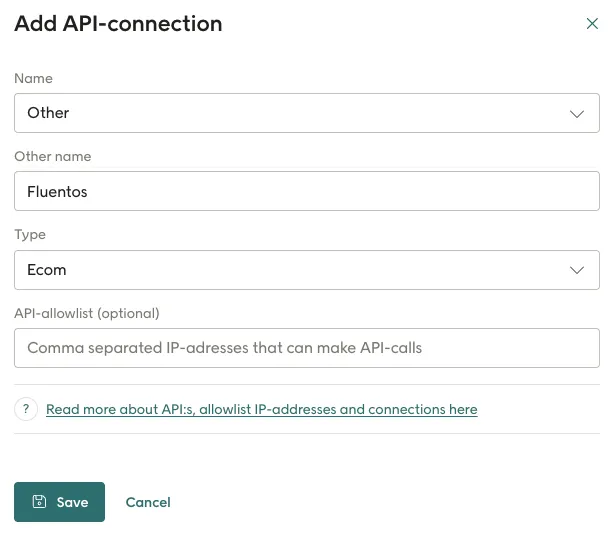
- Name -> select
-
Click Save.
After saving, the new connection appears in the list. Click Copy API key to copy it to your clipboard.
![]()
Find Your Base URL
Section titled “Find Your Base URL”Your Voyado instance URL is visible in your browser’s address bar when you are logged in. It follows this format:
https://your-instance.voyado.comIf you are unsure about your URL, contact your Voyado account manager.
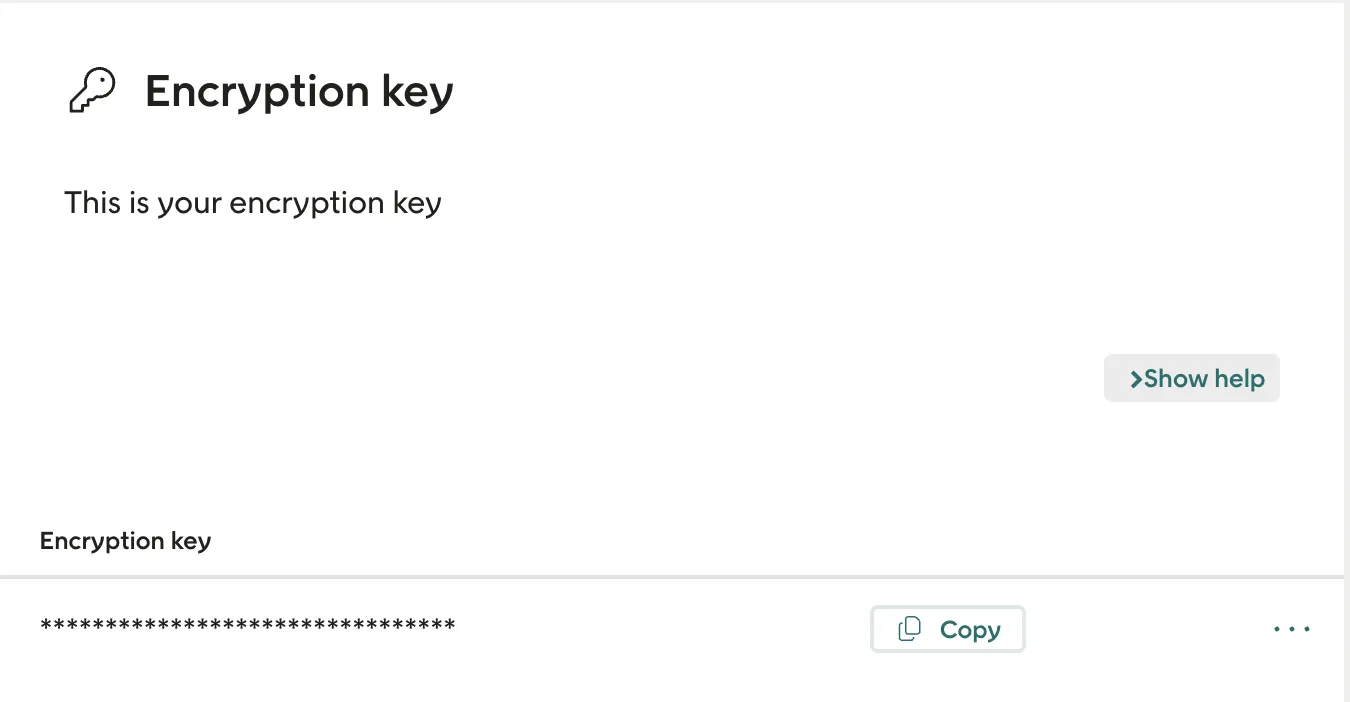
2. Find the Soft Identification Key in Voyado
Section titled “2. Find the Soft Identification Key in Voyado”If you want to use audience targeting, you also need the Soft Identification Key from Voyado.
- Log in to Voyado Engage.
- On the left side, select Administration.
- Go to Config Hub -> Integrations & External systems -> Soft Identification.
- Copy the Encryption key.
This key is used by Fluentos to decrypt the visitor identifier from the Voyado link parameter value (e.g. ?eclub=VALUE).
3. Add the Integration in Fluentos
Section titled “3. Add the Integration in Fluentos”- Open the Fluentos Dashboard at app.fluentos.com.
- On the left side, click Integrations.
- Click the Add New Integration button.
- Fill in the fields:
- Integration Name -> give it a name, e.g.
Voyado Production - Select Integration -> choose
Voyado Engage - Enabled -> toggle it on
- Voyado Engage API URL -> paste your Voyado base URL (e.g.
https://your-instance.voyado.com) - Voyado Engage API Key -> paste the API key you copied from Voyado
- Soft Identification Key -> paste the Encryption key from Voyado only if you want to use audience targeting
- Integration Name -> give it a name, e.g.
- Under Notification Recipients, add one or more email addresses to receive alerts if the integration encounters errors.
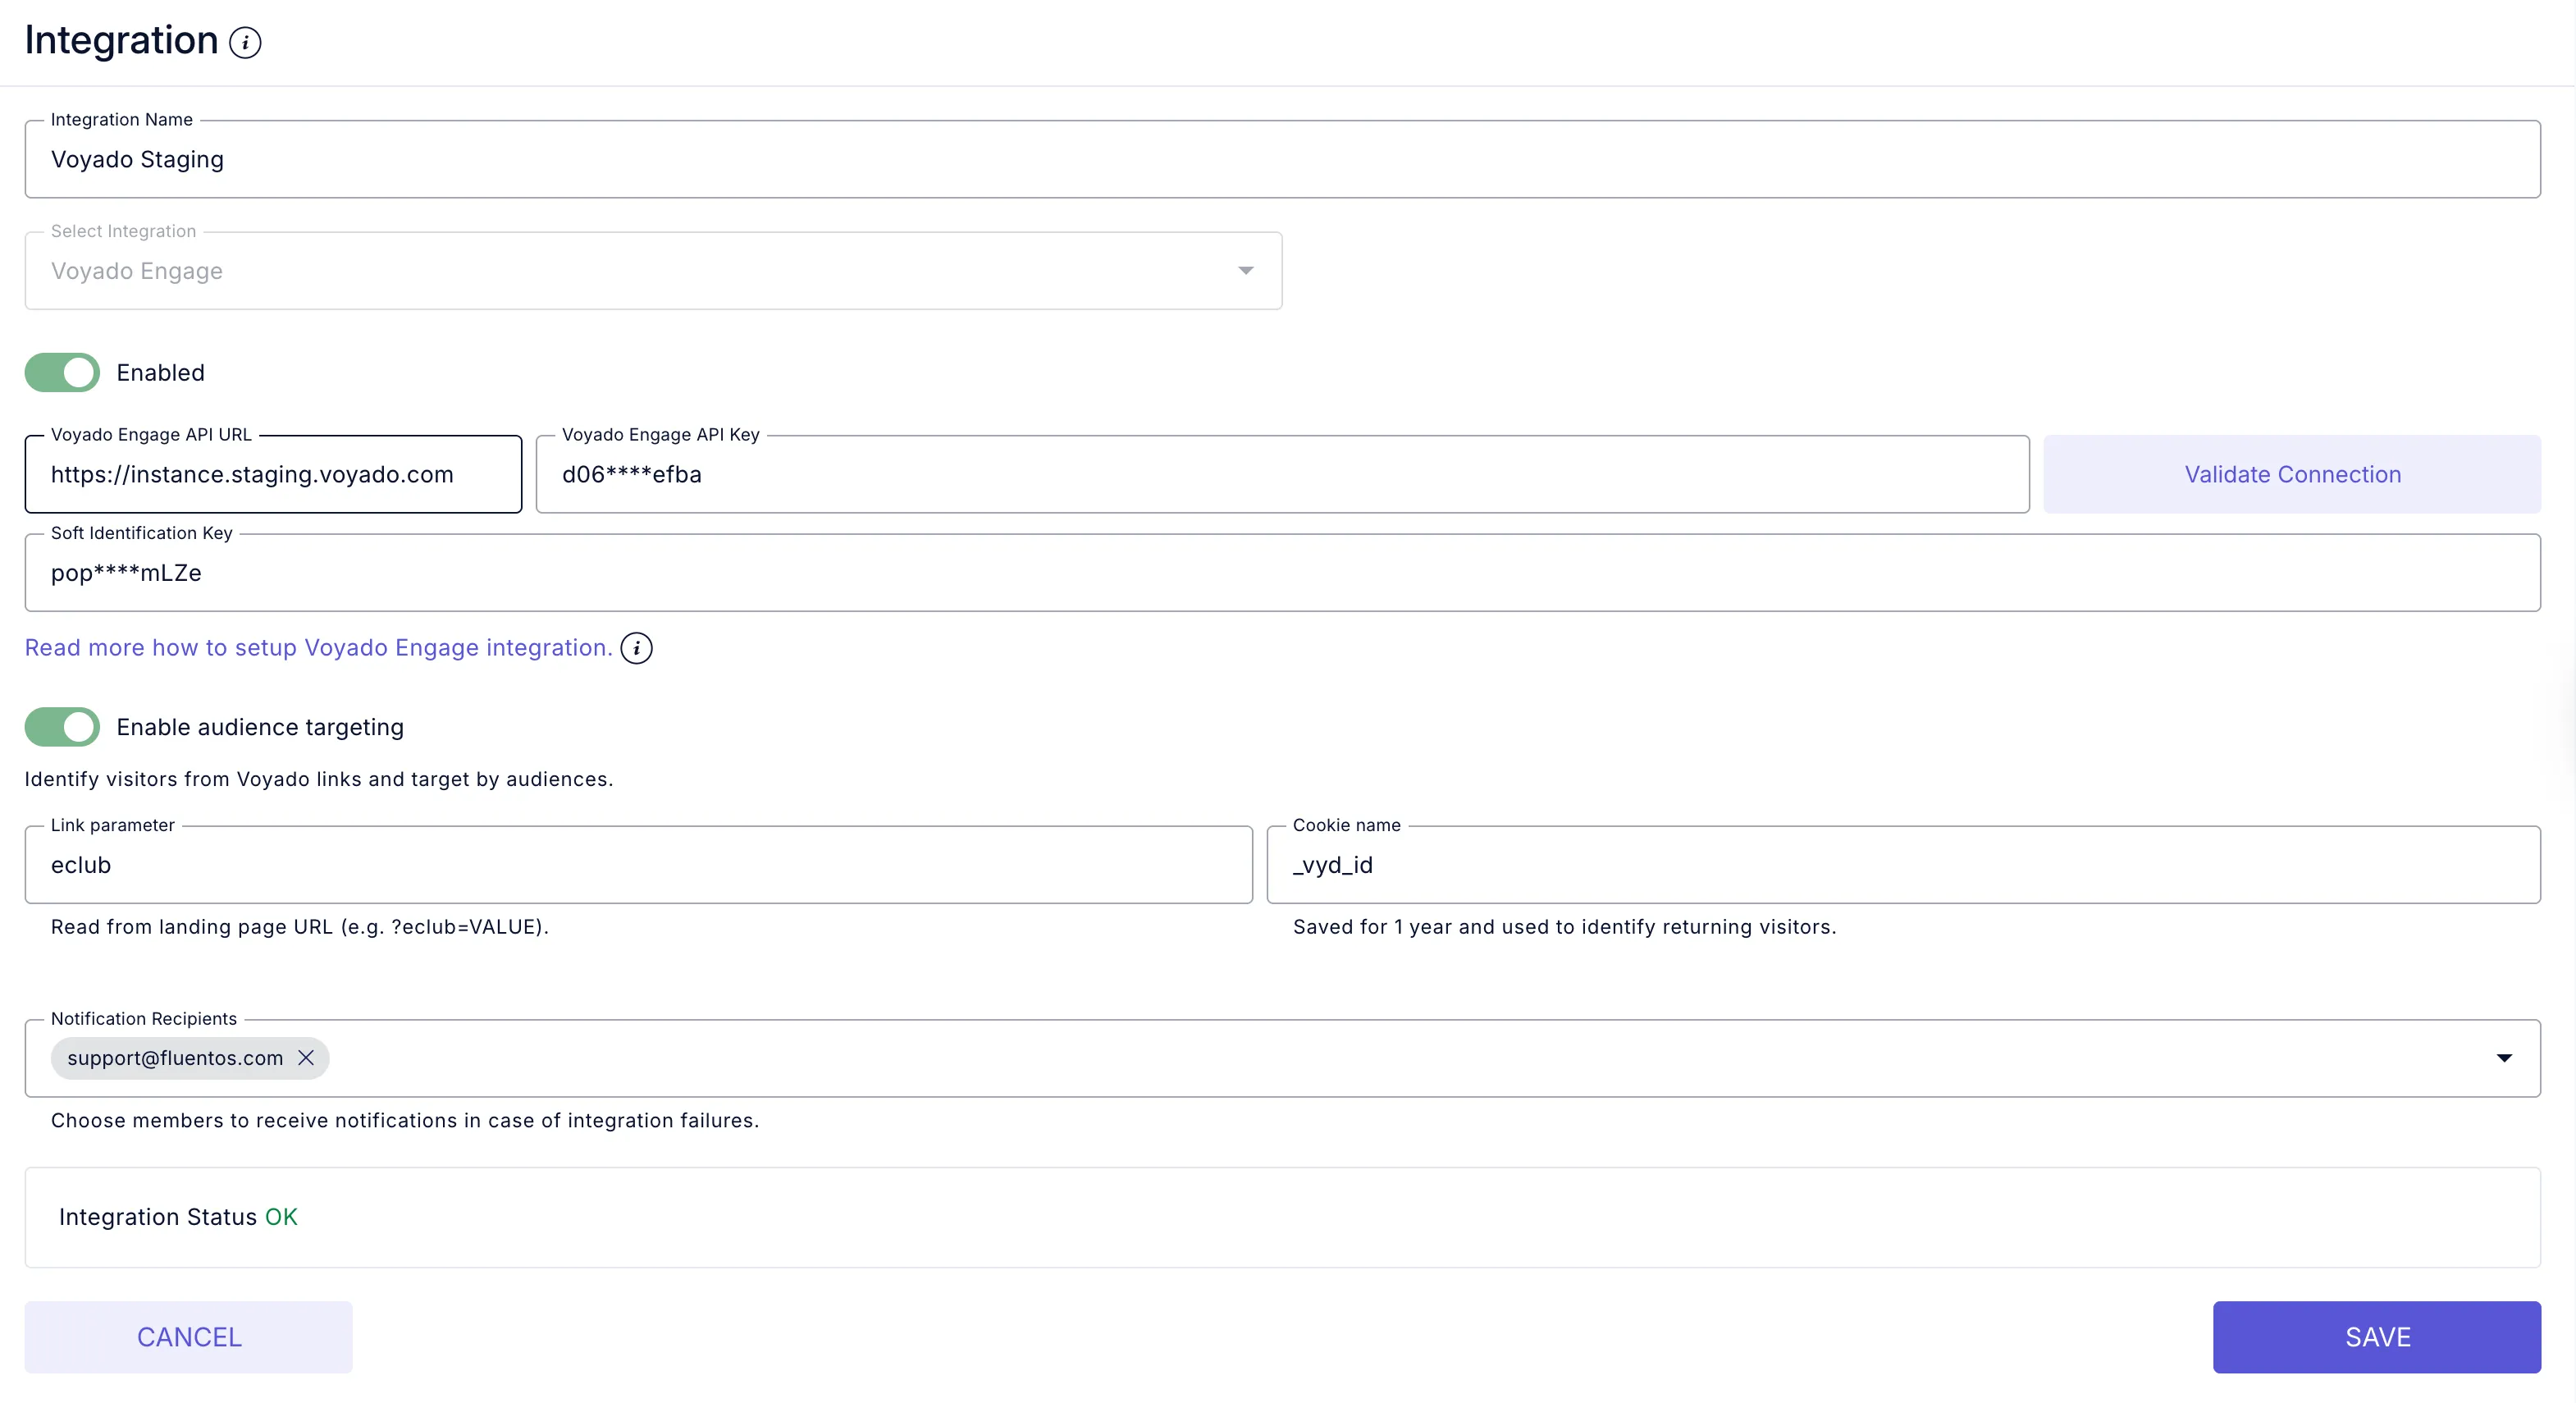
- Click Validate Connection to confirm everything is working. You should see “Integration Status OK” at the bottom.
- Click Save to finish.
Audience Targeting Settings
Section titled “Audience Targeting Settings”To identify visitors from Voyado links and target campaigns by Voyado Target Audiences, toggle on Enable audience targeting in the integration.
When enabled, two additional fields appear:
- Link parameter -> the URL query parameter Fluentos reads from the landing page (e.g.
eclubin?eclub=VALUE). - Cookie name -> the cookie where Fluentos stores the link parameter value to identify returning visitors.
Recommended defaults:
- Link parameter ->
eclub. - Cookie name -> use the default provided by Fluentos unless you are already storing the value in a cookie from Voyado Engage. In that case, use the same cookie name.
How it works:
- A visitor lands on your website from a Voyado link containing the configured parameter (e.g.
?eclub=VALUE). - Fluentos reads the parameter value from the URL.
- Fluentos stores the value in the configured cookie for one year.
- On later page views, Fluentos uses the stored value to check the visitor’s Voyado audience membership and evaluate targeting rules in the campaign’s Display Rules.
4. Profile Sync Strategy
Section titled “4. Profile Sync Strategy”When you connect a campaign to your Voyado integration, you can choose how Fluentos handles contacts that may already exist in Voyado. This is called the Profile sync behavior and it appears when you set up the campaign integration mapping.
| Strategy | What it does |
|---|---|
| Create or overwrite (replace) | Creates a new profile if it doesn’t exist. If a profile with that email already exists, Fluentos overwrites the mapped fields with the new submitted values. This is the default and recommended option for most use cases. |
| Create new only | Only creates new profiles in Voyado. If a profile with that email already exists, the submission is skipped entirely. |
| Update existing only | Only updates profiles that already exist in Voyado. If no profile is found for the submitted email, nothing happens. |
5. Connect a Campaign to Voyado
Section titled “5. Connect a Campaign to Voyado”Once the integration is saved, you can link it to any campaign that has form fields (inputs, checkboxes, etc.).
- Open your campaign in the Fluentos editor.
- Go to the Publish tab -> Integrations.
- Select your Voyado integration.
- Choose the Profile sync behavior that fits your use case (see above).
- Under Assign Components to Integration Fields, map each form component to a Voyado field.
- Optionally, add Fixed Values for fields that should always be the same (e.g.
countryCode=SE). - Click Save.
Field Mapping Reference
Section titled “Field Mapping Reference”Below are the most commonly used Voyado fields you can map your campaign components to:
| Voyado Field | Description |
|---|---|
email | Contact’s email address - required for every submission |
firstName | First name |
lastName | Last name |
mobilePhone | Mobile phone number |
countryCode | Two-letter country code, e.g. SE, NO, DK |
lang | Language code, e.g. sv, en |
street | Street address |
city | City |
zipCode | Postal code |
birthDay | Birthday in YYYY-MM-DD format |
gender | Gender |
externalId | External identifier (can be used instead of email) |
source | Where the contact came from, e.g. Fluentos |
Communication Preferences (Fixed Values)
Section titled “Communication Preferences (Fixed Values)”Use Fixed Values to control marketing consent flags. Set these to true or false:
| Field | What it controls |
|---|---|
acceptsEmail | Email marketing consent |
acceptsSms | SMS marketing consent |
acceptsPostal | Postal mail consent |
6. Using Voyado Audience Targeting in Campaigns
Section titled “6. Using Voyado Audience Targeting in Campaigns”After enabling audience targeting in the Voyado integration, you can target campaigns to specific Voyado audiences from the campaign editor.
- Open your campaign in the Fluentos editor.
- Go to the Publish tab -> Display Rules.
- Under Audience Targeting, toggle on Target by audience.
- Select your Voyado integration as the Data Source.
- Set the Rule (e.g.
In audienceorNot in audience). - Select the Audience from the dropdown — audiences are fetched directly from Voyado.
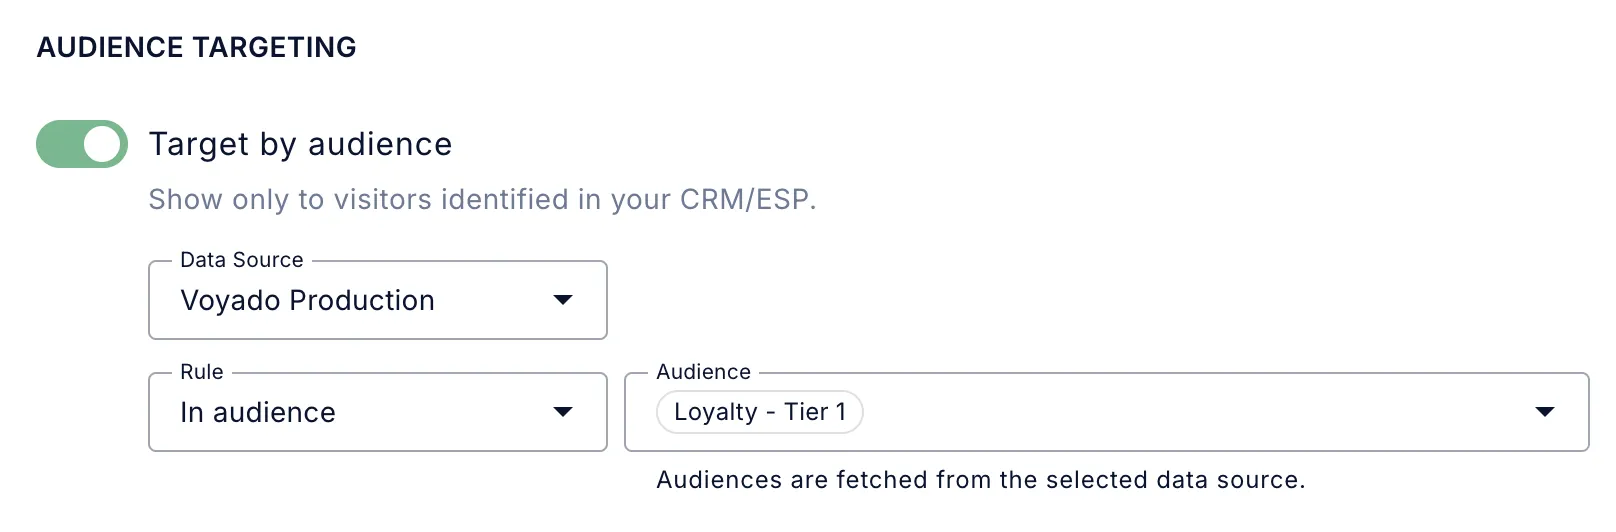
When a visitor arrives from a Voyado link, Fluentos identifies them using the stored cookie value and checks their Voyado audience membership. The campaign is shown only if the visitor matches the configured audience rule.
7. Testing Your Setup
Section titled “7. Testing Your Setup”- Create a test campaign with at least an email input field.
- Publish it and submit a test entry with your own email.
- Go to Voyado Engage and search for the email you submitted.
- Verify the contact was created and all mapped fields are filled in correctly.
Test Audience Targeting
Section titled “Test Audience Targeting”If you also enabled audience targeting:
- Make sure your Voyado link contains the configured parameter, for example
?eclub=VALUE. - Open that link in a browser.
- Confirm the visit happens on a page where the Fluentos script is loaded.
- Verify that the configured cookie is created in the browser.
- Open a campaign that targets a Voyado audience and confirm it behaves as expected for that visitor.
8. Troubleshooting
Section titled “8. Troubleshooting”Integration validation fails:
- Verify the base URL starts with
https://and has no trailing slash - Make sure the API key was copied in full - Voyado keys are long
Contacts not appearing in Voyado:
- Check that
emailis mapped in your campaign integration - it is required - Look at the integration status in Fluentos for any error indicators
- Confirm your profile sync strategy is not set to “Update existing only” when you expect new contacts to be created
Field values not syncing:
- Double-check the field names are selected correctly in the mapping
- Voyado field names are case-sensitive
- If using fixed values, make sure the value format matches what Voyado expects (e.g.
true/falsefor preferences,YYYY-MM-DDfor dates)
Audience targeting does not work:
- Verify Enable audience targeting is turned on in the Voyado integration
- Confirm the Soft Identification Key matches the Encryption key from Voyado
- Confirm the landing page URL contains the configured parameter, for example
eclub - Check that the Link parameter in Fluentos matches the parameter used in your Voyado links exactly
- Verify the configured cookie is created in the browser after visiting from a Voyado link
- Make sure the Fluentos script is loaded on the landing page where the visitor arrives